
For backpacking, I find a 1:24,000 map works best. This means every inch is 24,000 inches or 2,000 feet. Every quarter inch is 500 feet.
I get maps from free maps from http://www.usgs.gov/pubprod/. The website is complicated and beyond the scope of this post.
If I buy a map, the first thing I do is make a copy of the area I want to hike in. Most trails are cleverly designed so you have to buy two or even three maps. Cut and paste for real to get it on one piece of paper.
Here is the step by step.
1. Marking the map
1. Trace the dashes on the trail marking with a pencil. Trace a few dashes on each intersecting trail.
2. Look at the scale of miles and find the distance for a tenth of a mile.

Many compasses have convenient markings on the baseplate. If these markings are not there, then make a couple marks on the edge of a piece of paper.

Make a tick mark every 0.1 miles.

Label the distance each 0.1 miles. If you prefer, label every 0.5 miles. Note: This particular map didn't have a trail on it, so I made one up.
2. Orient the map
You will need a good compass, some tape, and a table that has no metal parts. Slide the compass around the table to make sure there is nothing affecting the needle. Cell phones, computers, tablets, belt buckles, knives, and other objects that either have iron in them or an electric field can affect the compass.
1. Find the variation/declination
The magnetic north pole is not in the same location as the true north pole. This means you will have to orient the map.
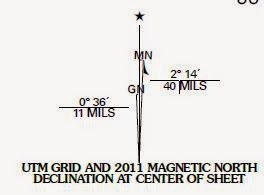
You will find this diagram somewhere in the margin of the map. Look for the variation/declination. Here it is 2 degrees and 14 minutes. There are 60 minutes in a degree, so it's about 2.25 degrees. I'll use 2 degrees since I can't read a 1/4 degree on the compass.
2. Draw Magnetic North Vector
The technique I use comes from aviation and is easier than what people who use topo maps usually use.
Lay the map on the table and the side of the baseplate along a longitude line. I've found the edge of USGS maps always parallels a longitude line. Find a longitude line close to the center of the map. If you are going to be folding the map, draw more than one arrow.

Turn the dial on the compass so north is under the direction arrow on the baseplate. Turn the map on the table so the compass needle aligns on the north arrow on the compass.
Remember this diagram? We want to tilt the MN vector to the right. Rotate the whole compass to the right so the needle is displaced from North by an amount equal to the variation. In this case, 2 degrees. Draw the vector along the side of the baseplate. Put an arrow on the top and label it MN. (This is convention.)

To orient the map in the field, turn the compass dial so N is under the direction of travel arrow on the baseplate. Put the side of the baseplate along the vector for Magnetic North. Turn the map so the compass needle is on the compass arrow in the background.
3. Make a mileage/direction table
Most people don't do this step. It's a great way to become familiar with the trail, and it saves time in the field.

Slide the compass around a table top to make sure there is nothing that affects the needle. Turn the dial on the compass so it is under the direction of travel arrow. Put one side of the baseplate along one of the MN vectors. Turn the map so the compass needle is over the north arrow in the background and under the direction of travel arrow. Tape the map down.

For each segment of the trail, lay the direction of travel arrow over the segment and turn the dial so the arrow in the background is under the compass needle. Read the magnetic heading under the direction of travel arrow.
Do this for each segment of the trail and make a table for the whole trail. This way you don't have to orient the map on the trail to get exact bearings for a segment of the trail.
In the next post on this topic, I'll explain how to stay oriented while hiking.
No comments:
Post a Comment